So, for those long-time readers of mine (hrmmm... that makes pretty much all of you, doesn't it?), you may remember this post from way back at the beginning, where I told you all how to make my Oma's delicious Heffezopf (jeez I hope I am spelling that right...)
Anyway, a few of you remarked that those instructions, umm, kind of sucked. And you were right. Looking back at it I couldn't remember how to make the sweet bread for the life of me and had to call my Oma up just to make sure I was on the right track.
So I'm here to rectify my mistake. This past Friday I usurped Mr. Lurie's kitchen and went about baking Heffezopf Oma-style, i.e. in one huge batch. Here's how I did it:
Ingredients:
4-6 lbs flour (lower for whole wheat, higher for white, though I'd recommend non-whole wheat flours until I get the peculiarities of the WW recipe down)
4-5 yeast packets
2.5 cups of sugar
2.25 sticks of butter
2 cups of milk
5 eggs
Salt to taste
Oven preheat: 375. Do this after the dough has risen.
This should make 4-5 loaves, depending on how large the loaves are.
Step 1:
Pour about 2/3s of the flour into a large mixing bowl. Make a small impression on the peak of the flour pile, not unlike a volcano:
Step 2:
Mix the yeast packets into hot water and pour on top of the flourcano. It should look like the volcano has spewed forth liquid hot magma:
Step 3:
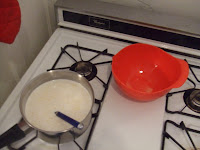
In a sauce pan mix up the milk, sugar and 2 sticks of butter and put on mid-low heat. Stir to make the sugar/butter dissolve into the milk and continue to heat until the butter has completely melted. Save the butter wrappers for a later step.
Step 5:
EDIT: because I am an idiot sometimes and forgot that really hot things and yeast don't mix, PLEASE COOL THE EGG/BUTTER/MILK DOWN BEFORE POURING ON THE FLOUR. Make sure it is luke warm before pouring!
Step 6:
Now we stir the dough, letting the flour absorb all of the water. Add flour as needed until it gets firm enough that you can use your hands.
Step 7:
Once it is firm enough, coat your hands in flour and pounding it with the heel of your hand, flopping it over, and pounding it again until it has a smooth consistency.
Step 8:
Once the dough has been beaten into smootheness, gather the dough into a hemisphere and then cover to let it rise for about an hour.
Step 9:
After it has risen, eat some of the dough. It is delicious.
Step 10:
Tear/slice out a loaf-sized chunk of the dough from the rest, then tear/slice that into two equally sized halves.
Step 11:
For rectangular bread pans: Roll the two halves into long pieces roughly the length and combined width of your baking pan. Then braid the two loves together, like so:
For round bread pans you can simply make a glob of dough in a hemispheric shape. You can also add details to these kinds of breads by cutting with a knife, like this:
Step 12:
Using the butter wrappers and the quarter stick of butter grease the sides and bottom of your bread pans. You don't have to use all of the butter, but make sure that all surfaces are greased.
Step 13:
Place your braided/glob of dough into it's bread pan. Repeat steps 10-13 as needed to use up the rest of your dough.
Step 14:
Beat another egg, then using a basting brush (or a spoon if necessary) coat the top and sides of your doughs with the beaten mixture. This will keep your bread from burning and give the crust nice coloring and texture.
Step 15:
Place your loaves in the oven and let them bake for 45 minutes to an hour. Check in every so often- if they look like they are drying too much brush them with more beaten egg.
Step 16:
Once they look like below, take them out to cool. Fresh, warm Heffezopf tastes the best, so be ready to sacrifice one to the ravenous hordes!
Storage:
Make sure to wrap your Heffezopf to prevent it from drying out and going stale. You can also place them in Ziploc bags and freeze them for later consumption or for mailing to friends and family.
Eating:
Heffezopf is great by itself or covered in a variety of toppings, my two favorites being butter and maple cream sugar. I would recommend against toasting as the moistness of the bread is one of its selling points, so reheating in a microwave is recommended. Try out your own combinations, and enjoy!
Anyway, a few of you remarked that those instructions, umm, kind of sucked. And you were right. Looking back at it I couldn't remember how to make the sweet bread for the life of me and had to call my Oma up just to make sure I was on the right track.
So I'm here to rectify my mistake. This past Friday I usurped Mr. Lurie's kitchen and went about baking Heffezopf Oma-style, i.e. in one huge batch. Here's how I did it:
Ingredients:
4-6 lbs flour (lower for whole wheat, higher for white, though I'd recommend non-whole wheat flours until I get the peculiarities of the WW recipe down)
4-5 yeast packets
2.5 cups of sugar
2.25 sticks of butter
2 cups of milk
5 eggs
Salt to taste
Oven preheat: 375. Do this after the dough has risen.
This should make 4-5 loaves, depending on how large the loaves are.
Step 1:
Pour about 2/3s of the flour into a large mixing bowl. Make a small impression on the peak of the flour pile, not unlike a volcano:
Step 2:
Mix the yeast packets into hot water and pour on top of the flourcano. It should look like the volcano has spewed forth liquid hot magma:
Step 3:
In a sauce pan mix up the milk, sugar and 2 sticks of butter and put on mid-low heat. Stir to make the sugar/butter dissolve into the milk and continue to heat until the butter has completely melted. Save the butter wrappers for a later step.
Step 4:
While the butter is melting beat 4 of the eggs. When the butter is melted pour the beaten eggs into the sauce pan and let it heat for a bit on medium.
Step 5:
EDIT: because I am an idiot sometimes and forgot that really hot things and yeast don't mix, PLEASE COOL THE EGG/BUTTER/MILK DOWN BEFORE POURING ON THE FLOUR. Make sure it is luke warm before pouring!
Step 6:
Now we stir the dough, letting the flour absorb all of the water. Add flour as needed until it gets firm enough that you can use your hands.
Step 7:
Once it is firm enough, coat your hands in flour and pounding it with the heel of your hand, flopping it over, and pounding it again until it has a smooth consistency.
Step 8:
Once the dough has been beaten into smootheness, gather the dough into a hemisphere and then cover to let it rise for about an hour.
Step 9:
After it has risen, eat some of the dough. It is delicious.
Step 10:
Tear/slice out a loaf-sized chunk of the dough from the rest, then tear/slice that into two equally sized halves.
Step 11:
For rectangular bread pans: Roll the two halves into long pieces roughly the length and combined width of your baking pan. Then braid the two loves together, like so:
For round bread pans you can simply make a glob of dough in a hemispheric shape. You can also add details to these kinds of breads by cutting with a knife, like this:
Step 12:
Using the butter wrappers and the quarter stick of butter grease the sides and bottom of your bread pans. You don't have to use all of the butter, but make sure that all surfaces are greased.
Step 13:
Place your braided/glob of dough into it's bread pan. Repeat steps 10-13 as needed to use up the rest of your dough.
Step 14:
Beat another egg, then using a basting brush (or a spoon if necessary) coat the top and sides of your doughs with the beaten mixture. This will keep your bread from burning and give the crust nice coloring and texture.
Step 15:
Place your loaves in the oven and let them bake for 45 minutes to an hour. Check in every so often- if they look like they are drying too much brush them with more beaten egg.
Step 16:
Once they look like below, take them out to cool. Fresh, warm Heffezopf tastes the best, so be ready to sacrifice one to the ravenous hordes!
Storage:
Make sure to wrap your Heffezopf to prevent it from drying out and going stale. You can also place them in Ziploc bags and freeze them for later consumption or for mailing to friends and family.
Eating:
Heffezopf is great by itself or covered in a variety of toppings, my two favorites being butter and maple cream sugar. I would recommend against toasting as the moistness of the bread is one of its selling points, so reheating in a microwave is recommended. Try out your own combinations, and enjoy!


